
Arranging items radially around a central point using C#
Recently I was looking for a way of display hierarchical information in a more compact form than the previous horizontal/vertical trees I was using. One of the concepts I looked into during this was the idea of arranging children radially around a central node.

This post discusses the sample project I created to explore the first part of this concept.
Caveat emptor. This post is out of my usual comfort zone as its dealing with trigonometry. Errors and misunderstandings may abound.
Calculating the angle
The first thing we need to do is calculate the angle between one
node and the next. The following formula will calculate the
number of degrees radians in the angle.
// count is the number of children we'll be placing around the center
double angle = 360.0 / count * Math.PI / 180.0;
Calculating a default distance
All the nodes in this diagram are going to be rendered as circles. This makes some of the layout work easier due to there being no corners, as the shapes can be closer to together without overlapping. To start with, I'll simply try and place the new nodes right next to the centre node.
// technically as I'm using circles the Width and Height should always be the same, but this may change in future
distance = Math.Max(node.Width, node.Height);
Positioning each node
Once we have the angle, we loop through each child node and using the angle and distance values we can calculate the centre point of the child using the sine and cosine mathematical functions. Once we've got the centre, we offset it by half the nodes width and height to get the upper left corner.
for (int i = 0; i < nodes.Count; i++)
{
  DiagramNode child;
  int x;
  int y;

  child = nodes[i];

  // calculate the center of the child node offset from
  // the central node
  x = cx + Convert.ToInt32(Math.Cos(angle * i) * distance);
  y = cy + Convert.ToInt32(Math.Sin(angle * i) * distance);

  // adjust the final location to be the top left instead of the center
  child.Location = new Point(x - (child.Width / 2), y - (child.Height / 2));
}

With this code in place, our diagram is taking shape - at least until we add enough nodes that they start to overlap with each other. If this happens, we need to detect if the nodes overlap using Euclidean geometry.
Testing if two circles overlap

To test if circles overlap, we calculate the distance between the centre of the first circle and the second. If the distance is less than the radius of the two circles, then they intersect.
private bool DoCirclesInsersect(int cx1, int cy1, int r1, int cx2, int cy2, int r2)
{
  int dx;
  int dy;
  double distance;

  // Find the distance between the centers
  dx = cx1 - cx2;
  dy = cy1 - cy2;
  distance = Math.Sqrt(dx * dx + dy * dy);

  return distance < r1 + r2;
}
This is almost exactly the same method used in my previous post of finding nearest colours.
For a much more detailed version of this function which can also determine at which points on the edges of the circles intersect see this C# Helper post. It also describes the math, something I'm not even going to try and do.
Brute forcing the intersection
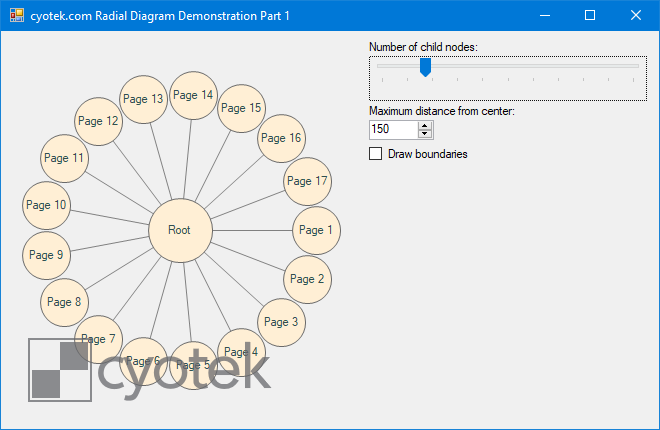
I'm sure there's probably a much better way of doing this, but as I don't know of one I resorted to brute forcing - after positioning the children, I check them to see if there's any overlap. If there are intersections, I increment the distance, re-position the nodes and test again. To avoid nodes being placed excessively far from the centre node, once the distance is above a defined maximum I abort the testing and use the maximum value, regardless of overlap.
The below code only considers the intersection of one child node with an adjacent child node. However, if the central node is smaller than the children, then it is possible for the child nodes to overlap the parent. The full demonstration program tests for intersection with both the parent node and the next child node to avoid this.
private bool TestNodes(List<DiagramNode> nodes)
{
  bool result;
  int count;

  result = true;
  count = nodes.Count;

  for (int i = 0; i < count; i++)
  {
    int cx1;
    int cy1;
    int cx2;
    int cy2;
    int r1;
    int r2;
    int next;
    Point c1;
    Point c2;

    next = i < count - 1 ? i + 1 : 0;

    c1 = nodes[i].Center;
    c2 = nodes[next].Center;

    cx1 = c1.X;
    cy1 = c1.Y;
    r1 = nodes[i].Width / 2;

    cx2 = c2.X;
    cy2 = c2.Y;
    r2 = nodes[next].Width / 2;

    if (this.DoCirclesInsersect(cx1, cy1, r1, cx2, cy2, r2))
    {
      result = false;
      break;
    }
  }

  return result;
}

private void PositionDiagram(DiagramNode node)
{
  int count;
  double angle;
  int distance;
  int cx;
  int cy;
  List<DiagramNode> childNodes;
  Point center;

  childNodes = node.ChildNodes;

  count = childNodes.Count;

  angle = 360.0 / count * Math.PI / 180.0;

  // if we were using squares we'd need some extra padding
  // but as I'm using ellipsis we can use use the largest axis
  distance = Math.Max(node.Width, node.Height);

  // need to use the centerpoint of our node
  // to ensure all other nodes are an equal distance away
  center = node.Center;
  cx = center.X;
  cy = center.Y;

  // position the children
  this.ArrangeNodes(childNodes, cx, cy, angle, distance);

  // if there is more than one child node, check to see if any intersect with each
  // other. if they do, and the distance is within a given maximum, increase the distance
  // and try again. I've no doubt there's a much better way of doing this
  // than brute forcing!
  if (count > 1 && !this.TestNodes(childNodes))
  {
    this.BruteForceNodeLayout(childNodes, angle, cx, cy, distance);
  }
}

private void BruteForceNodeLayout(List<DiagramNode> childNodes, double angle, int cx, int cy, int distance)
{
  bool success;

  do
  {
    // increment the distance
    distance += childNodes[0].Width / 4;
    if (distance > _maximumDistance)
    {
      distance = _maximumDistance;
    }

    // first arrange all the nodes around the central node with a minimum distance
    this.ArrangeNodes(childNodes, cx, cy, angle, distance);

    success = distance >= _maximumDistance || this.TestNodes(childNodes);
  } while (!success);
}
Once the child nodes have moved sufficiently far enough away from the centre you could try staggering the nodes to make better use of the free space; this may allow for a closer grouping.
Although the demonstration program doesn't show this, this code works perfectly well if the child nodes are of varying sizes - it will try and position according to the largest child it finds.
Initial starting position
If you consider a clock face, the painting of the first node in
this example always occurs at 3 o'clock. This is actually
perfect for my needs, but if you wanted it to start from
somewhere else (for example 12 o'clock), you'd need to adapt the
code in ArrangeNodes.
Final thoughts

The technique in this article can be useful in other circumstances, for example I first used code similar to this to create a 12 node colour wheel as part of another concept program. But the general principle could be used for other things, such as dials, gauges and clock faces.
Due to the brute forcing for positioning, this code is nowhere near as optimal as I'd otherwise like it - if anyone has ideas for solving this I'd love to hear them!
I cut out a lot of the code from this article and just focused on the core functionality, a fully functional sample can be downloaded from the link below.
Update History
- 2017-11-05 - First published
- 2020-11-22 - Updated formatting
Downloads
| Filename | Description | Version | Release Date | |
|---|---|---|---|---|
RadialDiagramDemoPart1.zip
|
Sample project for the Arranging items radially around a central point using C# blog post. |
05/11/2017 | Download |
About The Author

The founder of Cyotek, Richard enjoys creating new blog content for the site. Much more though, he likes to develop programs, and can often found writing reams of code. A long term gamer, he has aspirations in one day creating an epic video game. Until that time, he is mostly content with adding new bugs to WebCopy and the other Cyotek products.
Leave a Comment
While we appreciate comments from our users, please follow our posting guidelines. Have you tried the Cyotek Forums for support from Cyotek and the community?
Comments
Manuel Quartier
#
Thanks for the code, this is exactly what I need!
While reading I found one typo. In "Calculating the angle" the calculated value is in radian, not in degree.
Richard Moss
#
Manuel,
Thank you for commenting, I'm glad you found the code useful. Also thanks for the pointing out the typo, I've corrected that now.
Regards;
Richard Moss